Thursday, February 5, 2015

DIY: Marble Photo Frame

Hey, everyone!

Today I am excited to share this super easy and super chic DIY project with you!


What could be more glam than a marble photo frame? Such a pretty way to display a favorite photo! Let me show you how!

You will need:

Marble Contact Paper, sold here:


Scissors
Scotch Tape
Picture Frame (flat on all sides, not beveled)


Start by measuring your frame against the back of the contact paper. There is a handy grid and ruler on the back so it is super easy!


Figure out the width of the sides plus the front,


and the depth. I had to guess at this, and I gave myself a bit extra, just incase.


Figure out the height you will need and cut out the first strip.

I did the long sides first, and once you have your first strip cut, you can simply trace that piece and cut another.


Lay your first piece, starting at the back and wrapping towards the front. The paper is not super sticky which is good and bad. Good because you can easily adjust it. Bad because it can tend to lift in the corners. That's where the Scotch tape will come in later.


Once you have it smoothed down in the front, grab your scissors and make a small cut in towards the frame. This will allow you to wrap it inside..
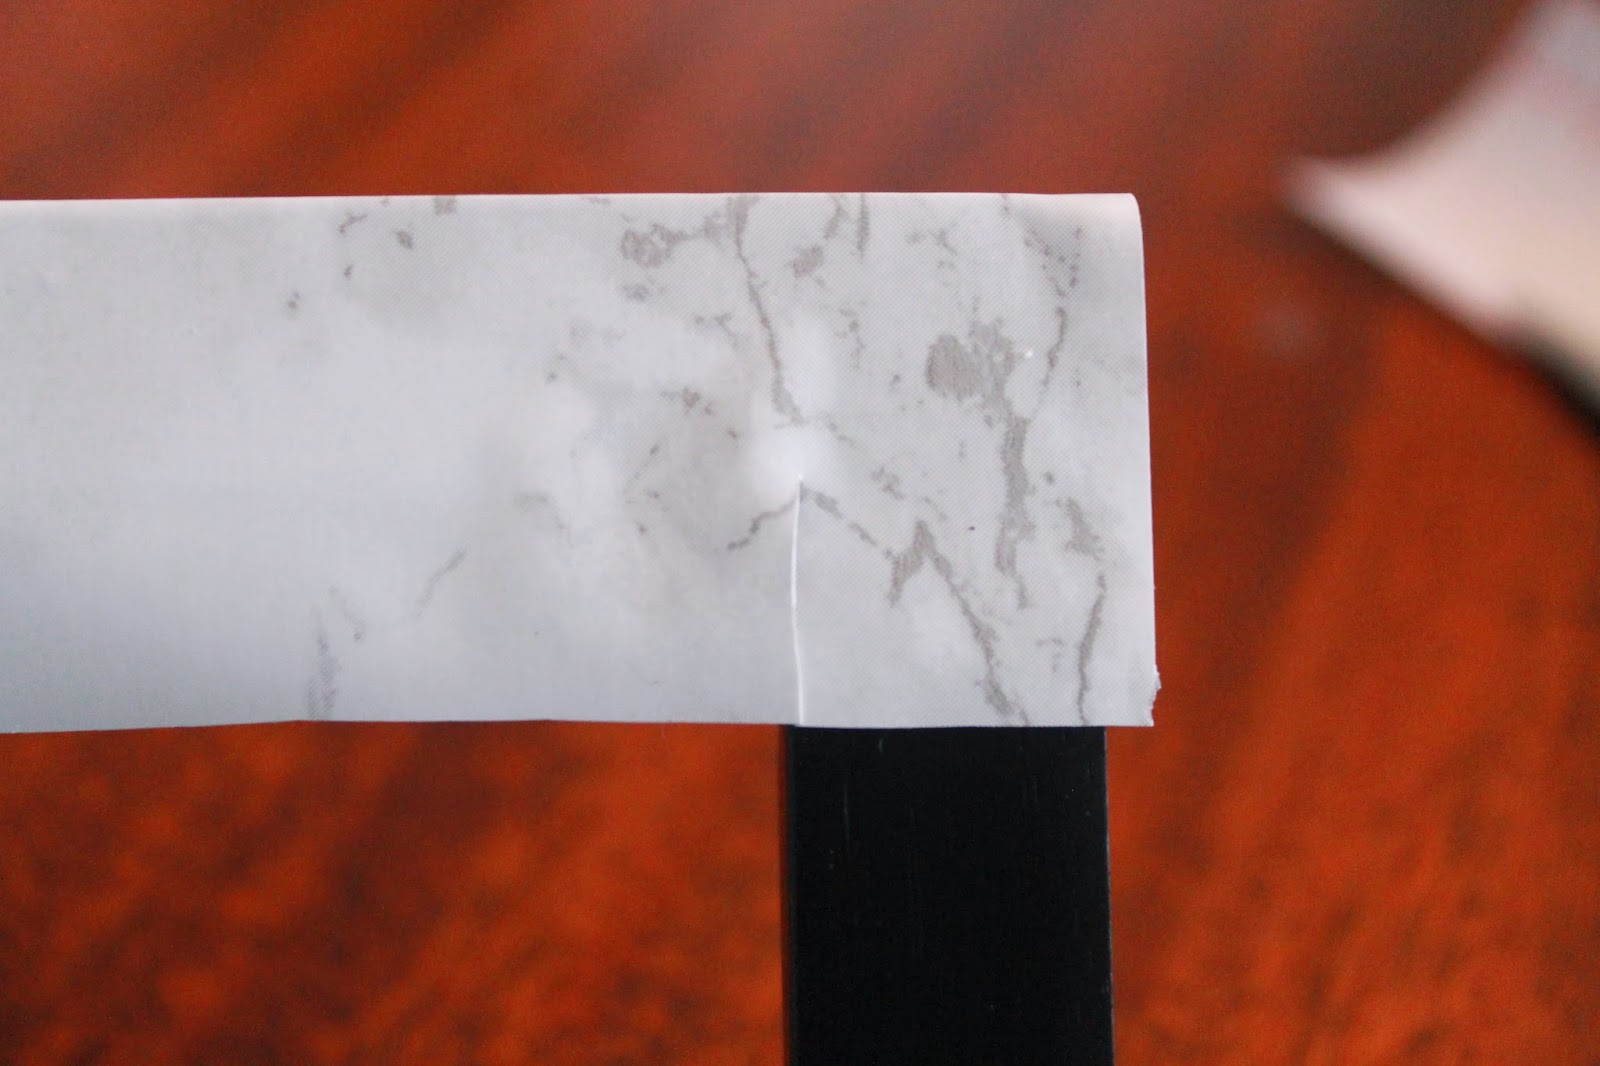

 like so:


Then do the same at the outside corners. I covered my corners in a bit of Scotch tape to help them hold. You can't see it at all if you're careful!


Both sides completed:


Now I again measured the top and bottom. I just remember my previous width and adjusted the height.


Wrap back to front and snip the corners. Seal any questionable places with Scotch tape and...


Voila!


So pretty! You will have seams, but you can't tell at all!


This took very little contact paper and the roll comes with a LOT. I had this left over from another (several) projects I was working on, so you get a lot of bang for your buck with this paper.


I love how it looks with my other frames! Happy crafting, everyone!


baby photography courtesty of: Thompson Digital Image

Xoxo,
Natasha

Wednesday, February 4, 2015

How To: Deep Clean Your Shark Navigator

Happy Wednesday, everyone!

Mid-week is usually a good time to break down and get serious about cleaning my house. I've recovered from the last weekend and Monday, and need to gear up for another one.

When it comes to cleaning, my Mom (who owns her own cleaning company) has me hooked on Shark products, especially the Shark Navigator. It's affordable, lightweight, and cleans like a champ. Another one of my favorite features? It is easy to disassemble to give it a good cleaning, because, let's face it, no matter what brand of vacuum you use, you always need to give it a good cleaning. I would say at least every 6 months, for me it's about every 3 (think two kids, a dog, a cat and a husband).

Here's my process:


Star with a filthy vacuum. Then gather several rags, cleaner of choice, scissors and a screwdriver (or something pointy to get into those tight crannies).


Go ahead and remove the tank and the main filter.


One you remove the dark grey piece that holds the filter, flip it upside down and you will find another.


Pop out the front piece and remove that filter as well. I throw these in the washing machine on speed wash with a teensy tinsy bit of detergent and a little bleach. Do not put them in alone, you don't want to ruin your washing machine with an excess of water. I usually throw in a towel or my other cleaning supplies (mopheads, dusters, etc).


 Detach the hose as well.


Lay it on it's back and grab those scissors! The scissors allow you to cut all the hair, strings, etc that have wound around the brush. Keep on clipping and pulling. 


Then I grab my screwdriver to scrape all the dust and debris that has plastered itself to the inside.


I washed off the brush bar with my cleaner, and then wrap it around the end of the screwdriver to scrub in the crannies.


Flip it over onto it's front and lets start scrubbing the outside. I start with the wheels as they are usually the dirtiest and then wipe down the rest.


Now stand it back up and clean off the front, top and handles. Make sure to get into the hose openings.


Now onto the sink! 


Spray the canisters with cleaner, scrub and rinse. 


 I lay the main canister out to dry on a kitchen mat.
 

 By this point, my filters have finished washing and I have thrown them in the dryer with a towel to dry. They dry very fast. In fact, they are nearly dry coming out of the wash, but you want to make sure they are completely dry. Otherwise all that dust and dirt you are vacuuming will stick to the filters and you will have a nastier mess than you started with.


Go ahead and reassemble and test it out!


 Can you feel the power??

Happy hump-day!
Xo, Natasha

Sunday, February 1, 2015

Tips For Setting Up a Successful Party Table Spread

Greetings from snowy Wisconsin! We are currently being buried in snow here, so what else is there to do but blog?

This weekend we hosted a graduation party for my little sister who just completed her cosmetology license program at Regency Beauty Institute. With that in mind, I thought I'd share a few tips on creating a pleasing food spread at your next gathering!


Because we were hosting the party at my house, we had to be fairly creative with anything "decorative."  After all, this isn't some grand banquet hall, it's my dining room! And that means we have to clean up the mess! This is why it's best to simple make the functional pieces pretty.


I picked up these perfect black and white striped napkins at Walmart, along with the paper straws to match. As far as colors go, I used a lot of what I had on hand. I happened to have black, white and pink tissue paper, so I made a simple garland and used that as the jumping off point. Don't go crazy with too many colors and overwhelm yourself, but you definitely don't need to be matchy-matchy with everything.


I attached extra tassels to some pink chopsticks just for fun, and used wine glasses in varying sizes to keep the height of objects varied. You want your eye to move around the table! Flat spaces are boring!


The fabric tablecloth over the buffet table has hints of teal and gold to tie the party decor and my wall color together. Make the party match your house!


Let your food make a statement. The color and arrangements of the food you serve can be just as beautiful as any decoration you could buy, and you get to eat it! A tiered stand isn't just for dessert. It displays this selection of fruit beautifully.


Offer a variety of food choices. Meat, cheese and veggie trays are just important as chips, candy and snacks. Not everyone wants to eat junk all the time, and if you are having small children at your party, parents will appreciate being able to incorporate some healthy items on their child's plate besides just treats. I always make my own cheese trays, it's more cost effective and I can control the quality of the food I'm setting out.


Group your condiments together. Extras and fixin's become beautiful when placed on a gold charger.


We chose to offer a sandwich bar as well as snacks. Guests can build their own with choices of several meats, cheeses and spreads. Keep the food spread over several tables. It allows for better traffic flow.

 
Use your pretty pieces. Now is the time! This gold ice bucket is beautiful and funtional, and when else will I have an excuse to use it?


I hope you were able to take away a few ideas for your next gathering! Remember to keep it simple. The company is what really counts!
Xoxo,
Natasha